
EPOXY FLOORING SYSTEM FOR – ELECTRONIC ASSEMBLY AREAS
Introduction
Electronic assembly areas demand a flooring system that ensures anti-static control, cleanliness, and visual organization. The surface must help prevent electrostatic discharge (ESD), maintain a smooth, dust-free environment, and enhance workflow precision through defined floor markings.
The Epoxy Flooring System for – Electronic Assembly Areas is a medium-duty, mild anti-static system developed by Ressichem to deliver consistent electrostatic performance, durability, and aesthetic precision. It offers a professional, easy-to-clean finish ideal for modern electronics manufacturing, testing, and assembly facilities.
Recommended Use Cases
- Electronic component and device assembly areas
- PCB production and testing facilities
- IT rooms, data centers, and server zones
- Control and instrumentation rooms
- Device calibration and packaging areas
- Cleanroom and ESD-sensitive manufacturing spaces
Step-Wise System Description
Step 1: Surface Preparation
- Proper substrate preparation is critical for the adhesion and performance of the anti-static system.
- Ensure the concrete substrate is clean, dry, and free of contaminants such as oil, laitance, or dust.
- Mechanically grind or shot-blast the surface to remove weak layers.
- Vacuum thoroughly to ensure a completely dust-free substrate.
- Verify that substrate moisture is below 5% before primer application.
Step 2: Application of Ressi EPO Primer LV
- Apply Ressi EPO Primer LV, a low-viscosity, solvent-free epoxy primer formulated to penetrate the substrate and enhance bonding between layers.
- Mix resin and hardener thoroughly in the specified ratio.
- Apply evenly with a roller or brush.
- Ensure complete coverage without puddling.
- Allow curing as per ambient temperature before the next step.
Step 3: Application of Ressi EPO Mid Coat S – GP (Optional)
- Apply Ressi EPO Mid Coat S – GP when additional surface levelling or mechanical reinforcement is needed.
- Apply at a minimum thickness of 1000 microns; 2000 microns are recommended for high-precision, smooth surfaces.
- Spread evenly with a notched trowel or squeegee, followed by back-rolling.
- Allow to cure overnight before the topcoat application.
- This step is optional, depending on substrate conditions and levelling requirements.
Step 4: Application of Final Anti-Static Topcoat
- Apply Ressi EPO Anti-Static, a conductive epoxy coating formulated to safely dissipate electrostatic charges while maintaining a seamless and cleanable surface.
- If Ressi EPO Mid Coat S – GP is used, apply Ressi EPO Anti-Static at 1000 microns.
- If no mid coat is used, apply Ressi EPO Anti-Static at 2000 microns to ensure total system thickness.
- Mix resin and hardener as specified and apply using a roller or squeegee for a smooth, uniform finish.
- Allow 48–72 hours for mild traffic and 7 days for full cure.
Step 5: Floor Markings (If Required)
- Apply Ressi EPO Gloss Might in a contrasting color as a roller-applied coat to mark designated workflow or safety zones.
- Ensure the base surface is cured and clean before applying markings.
- Use masking tape to maintain sharp boundaries.
- Allow complete curing before reopening the area.
Note:
- The total system thickness must be a minimum of 2000 microns.
- The Ressi EPO Mid Coat S – GP layer is optional, depending on floor condition and levelling needs.
- Refer to the product Technical Datasheets (TDS) for details regarding mixing ratios, coverage, pot life, and environmental conditions prior to installation.
System Advantages
- Anti-Static Control: Reduces electrostatic buildup for safe electronics handling.
- Smooth & Seamless Surface: Prevents dust accumulation and allows easy cleaning.
- Organized Workflow: Enables clean and precise floor marking integration.
- Aesthetic Appearance: Gloss finish enhances visibility and workplace order.
- Durable Performance: Resists light to medium mechanical wear.
- Hygienic & Low Maintenance: Non-porous and simple to maintain for controlled environments.
Maintenance Guidelines
- Clean regularly using mild, neutral pH detergents.
- Avoid exposure to harsh chemicals or solvents.
- Ensure ESD earthing continuity is properly maintained.
- Periodically inspect and recoat high-traffic zones if required.
System Summary Table
| Parameter | Description |
|---|---|
| System Name | Epoxy Flooring System for – Electronic Assembly Areas |
| Area Type | Electronic Production, Assembly, and IT Environments |
| Traffic Exposure | Light to Medium Duty |
| Primary Requirements | Anti-Static Control, Smoothness, Hygiene, Workflow Organization |
| Primer | Ressi EPO Primer LV |
| Mid Coat (Optional) | Ressi EPO Mid Coat S – GP (1000–2000 microns) |
| Topcoat | Ressi EPO Anti-Static (1000 microns with Mid Coat / 2000 microns without Mid Coat) |
| Marking Coat (Optional) | Ressi EPO Gloss Might (Roller Applied, Alternate Color) |
| Total System Thickness | Minimum 2000 Microns |
| Finish Type | Smooth, Gloss |
| Curing Time Before Use | 48–72 Hours for Mild Traffic / 7 Days Full Cure |
| Key Benefits | Anti-Static Control, Seamless Finish, Cleanability, Durability, Organized Appearance |
Conclusion
The Epoxy Flooring System for – Electronic Assembly Areas offers a precise, anti-static, and aesthetically refined flooring solution designed for sensitive electronic manufacturing environments. The sequence — Surface Preparation, Ressi EPO Primer LV, (Optional) Ressi EPO Mid Coat S – GP, Ressi EPO Anti-Static, (Optional) Ressi EPO Gloss Might — ensures a seamless, controlled, and professional workspace tailored to modern assembly and ESD-safe facilities.
System Summary
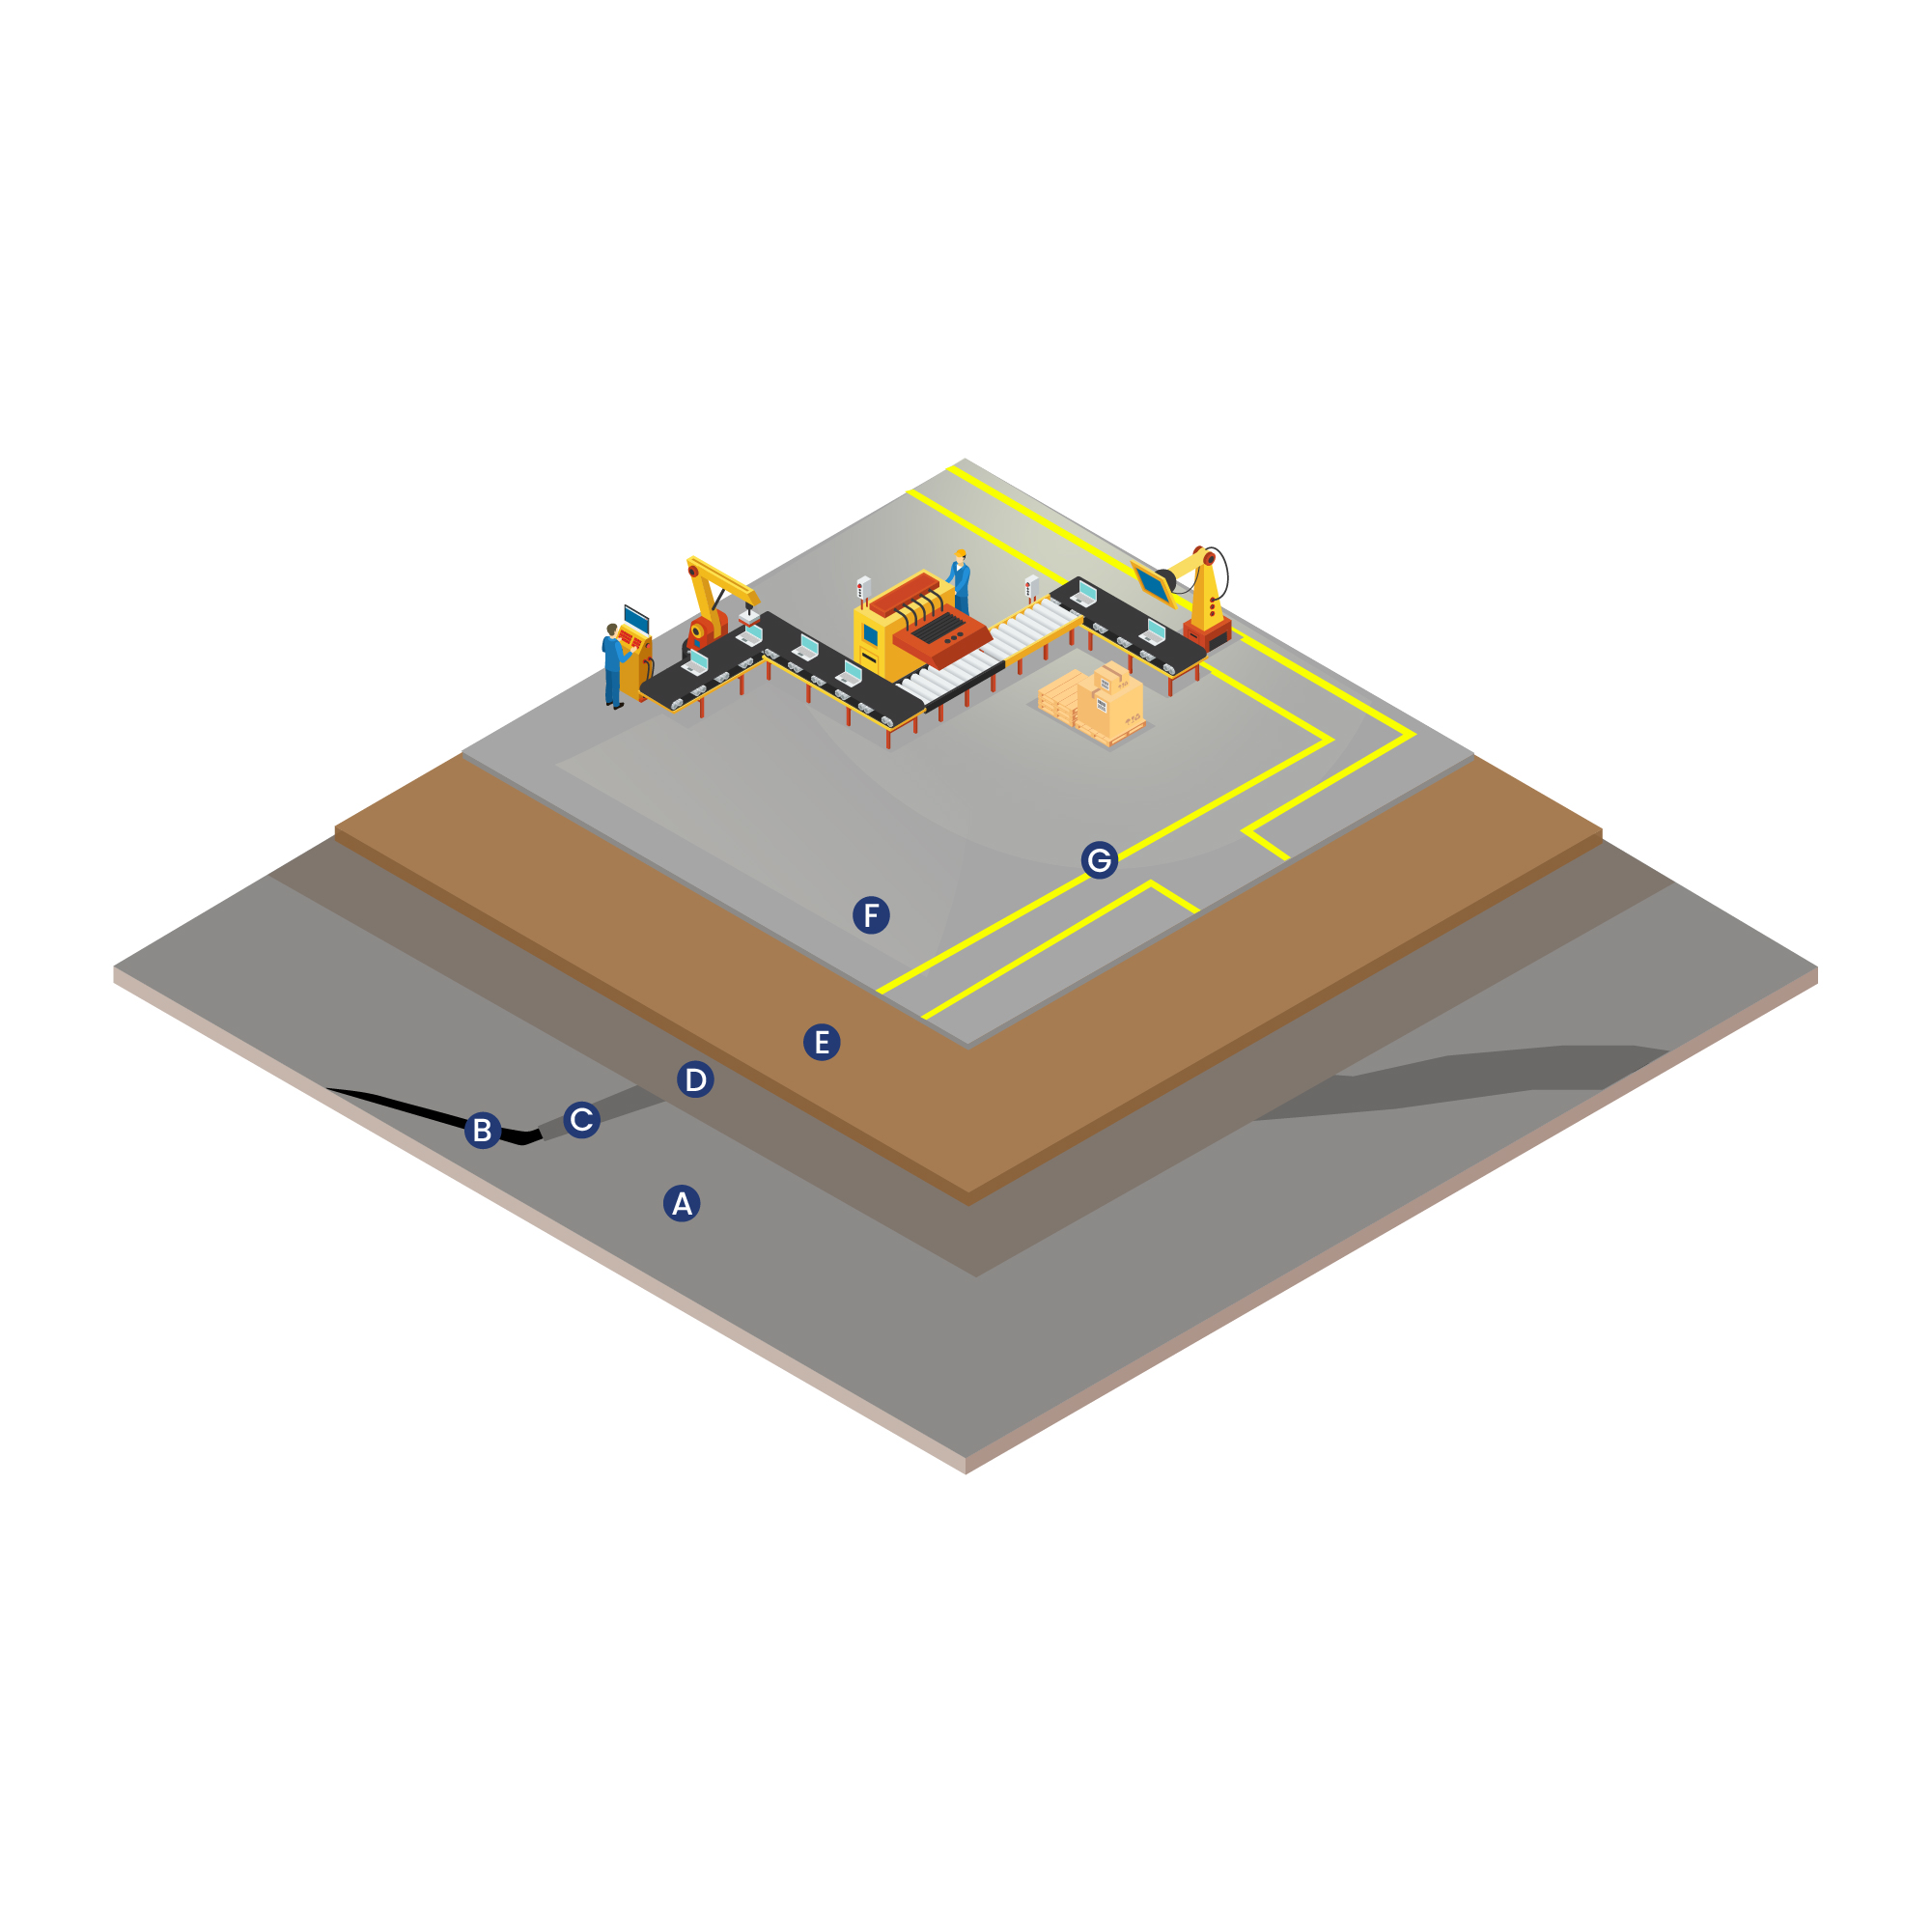
A Cementitious Surface: (Concrete slab or screed)
B Cracks and surface damage
C Crack Filler and Repairing Materials
D Ressi EPO Primer LV
E Ressi EPO Mid Coat S – GP
F Ressi EPO Anti Static
G Ressi EPO Gloss Might